Seven Steps to AI Coding
The setup you need before AI Coding
Step 1 of 7 · AI Coding Mastery
Command line interface (CLI)
The command line gives you direct, scriptable control over LLM APIs — far more than a chat window offers. It's where automation, agents, and reproducible workflows live. The payoff comes in four forms: more control over how you call APIs, a unified workflow across every operating system, real efficiency on repetitive tasks, and a concrete understanding of how an AI workflow actually fits together — all laid out below.
Windows users: install WSL (Windows Subsystem for Linux) to run these same commands. The breakdown below groups them by task.
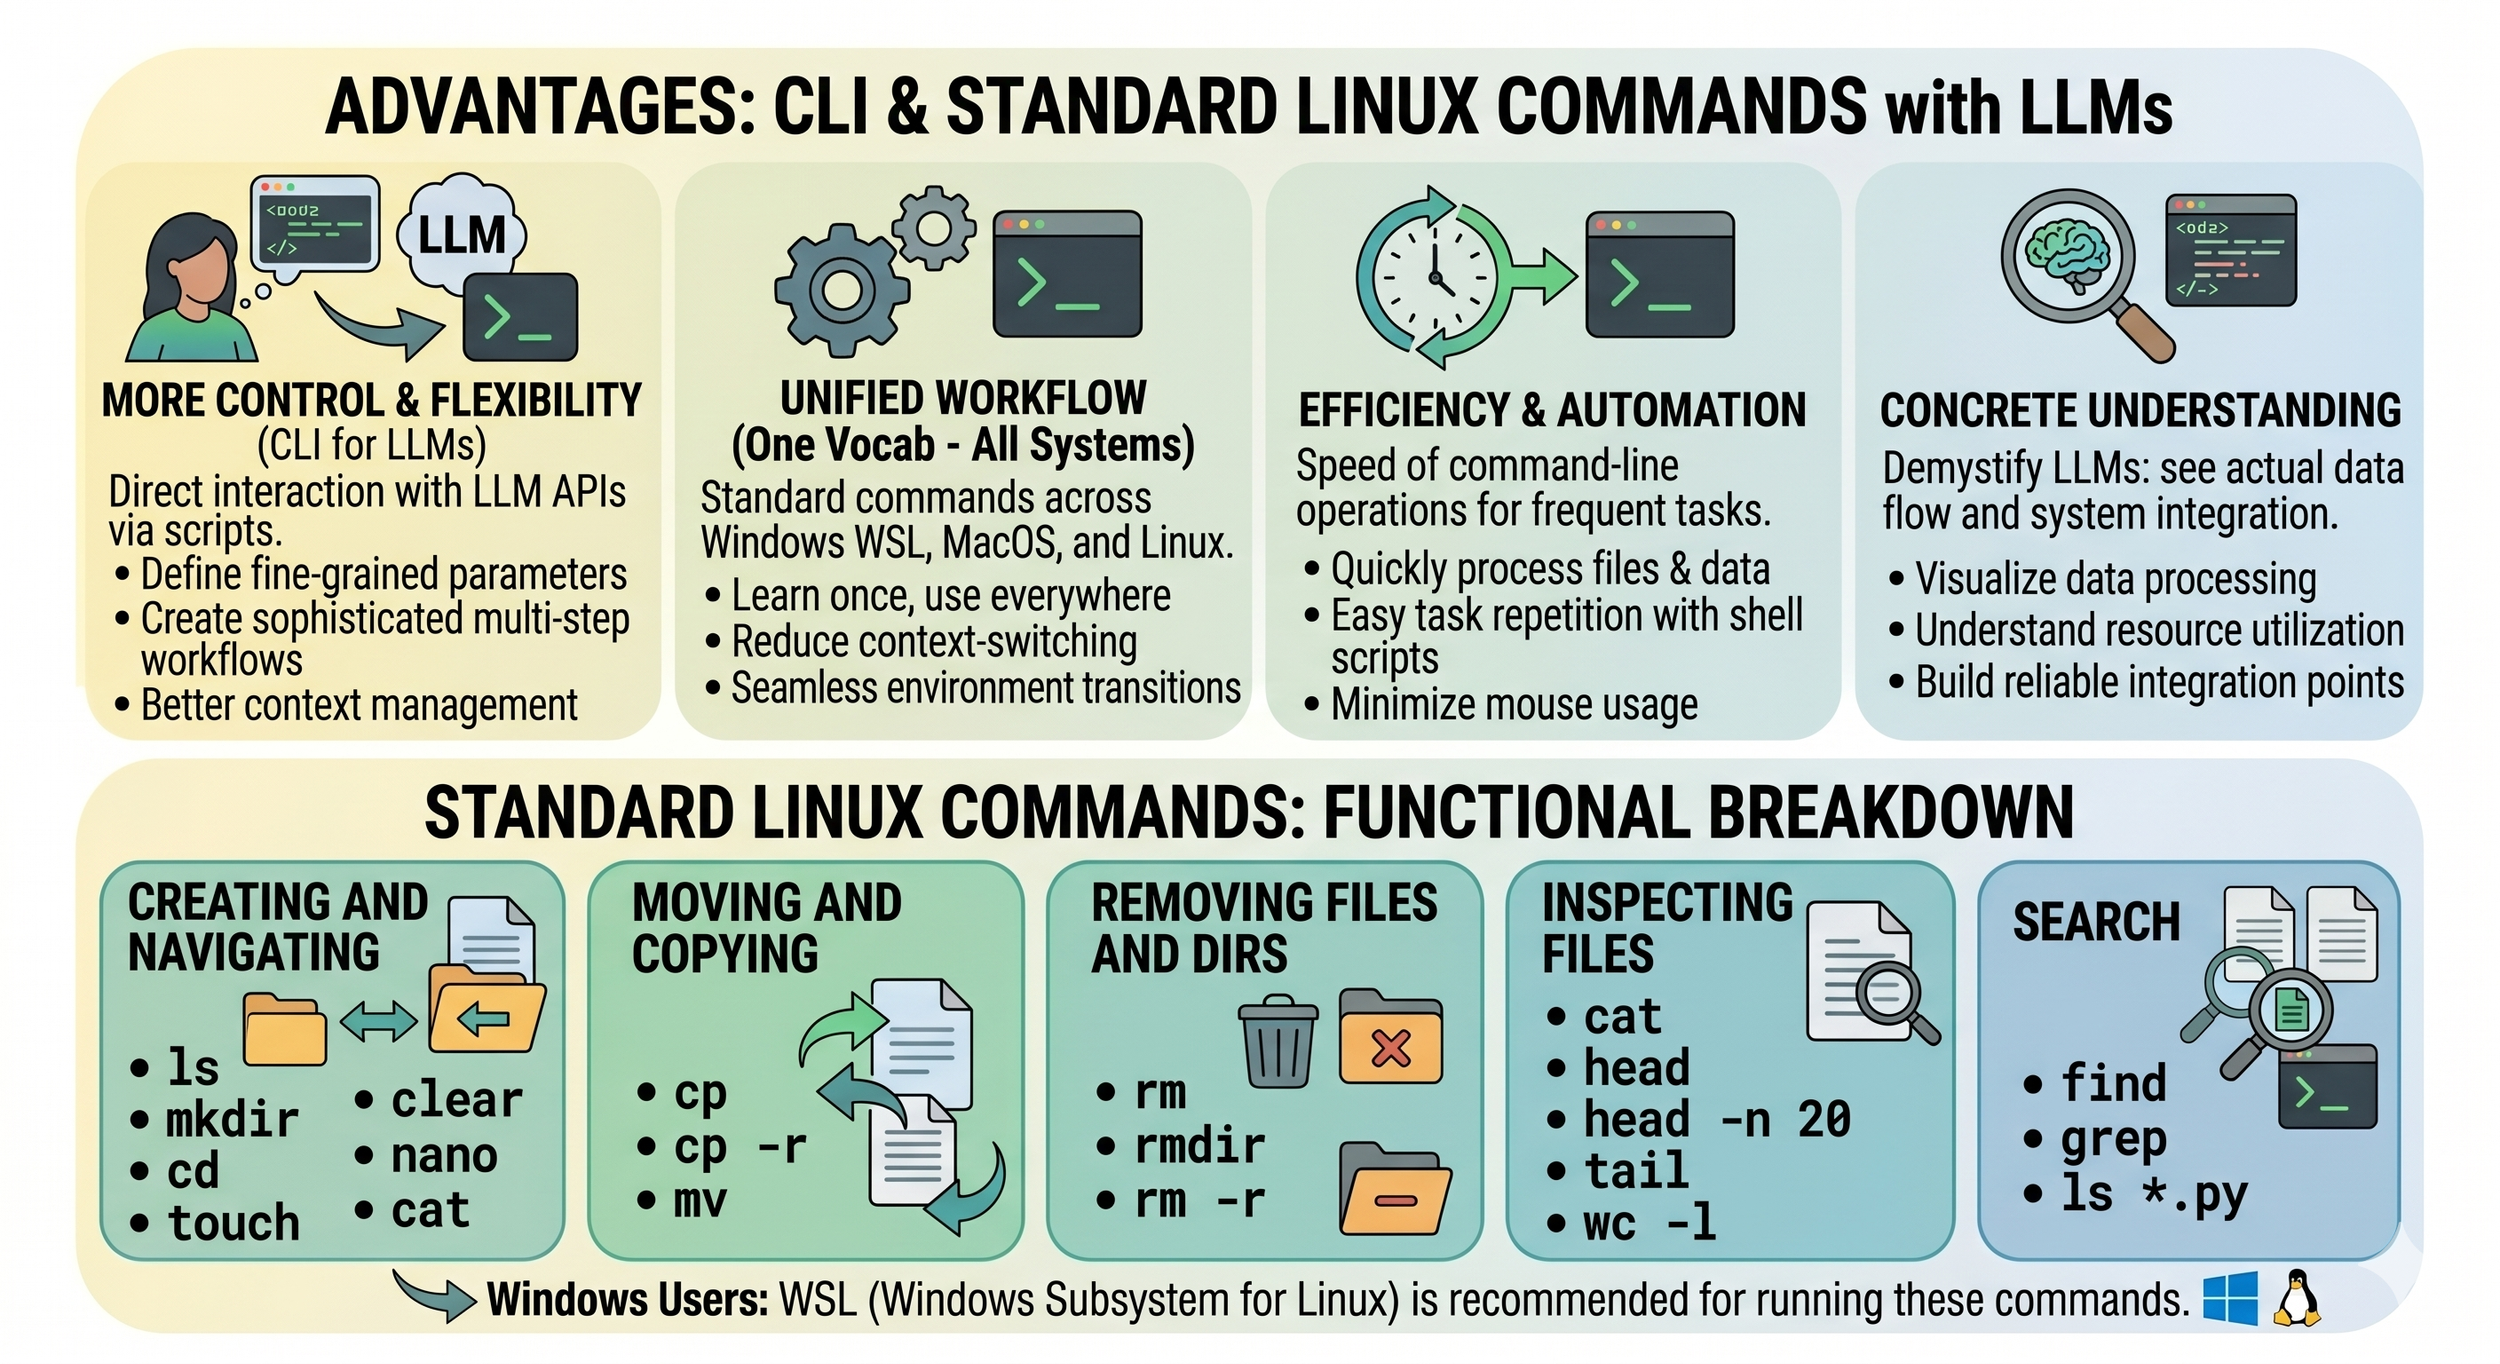
What each command does
Create & navigate
lslist files
mkdirmake a directory
cdchange directory
touchcreate empty file
clearclear the screen
nanosimple text editor
catprint file contents
Move & copy
cpcopy a file
cp -rcopy a folder + contents
mvmove or rename
Remove
rmdelete a file
rmdirdelete empty directory
rm -rdelete dir + contents
Inspect files
catprint whole file
headfirst 10 lines
head -n 20first N lines
taillast lines (-f = live)
wc -lcount lines
Search
findlocate files by name
grepsearch inside files
ls *.pylist by pattern
✱What's that *?
A glob — shorthand for "match any characters." ls *.py lists every file ending in .py. Globs are the shell's lightweight cousin of regex: same idea, simpler syntax.
*.pytest_*data?.csv[abc]*
Resources
ArticleDigitalOcean — 50+ essential Linux commands
Modern reference covering the fundamentals and progressing into more advanced commands.
VideoJoe Collins / EzeeLinux — Linux command line for beginners
Slow-paced walkthrough of the shell, navigation, file viewing, and file operations.
ReferenceRegex101 — Interactive regex builder & tester
Live regex playground with explanations as you type.
Step 2 of 7 · AI Coding Mastery
Python on your platform
Before writing a single line, know which Python you're running and where it lives. The naming differs by platform, and using the wrong interpreter is the most common source of "it works on my machine" frustration.
Windows vs. macOS / Linux: Windows usually exposes Python as python (or the py launcher). macOS and Linux ship a legacy python tied to Python 2, so Python 3 is invoked as python3. Match the command to your platform — they refer to different binaries.
Check the version that responds to your default command.
$ python --version
Python 3.12.4

$ python3 --version
Python 3.12.4
Confirm the actual binary path. Avoids shadowed installs.
$ which python3
/usr/local/bin/python3

# Windows:
> where python
Run a script, inline code, or a module.
$ python3 hello.py
$ python3 -c "print(2+2)"
$ python3 -m http.server
Resources
ArticleReal Python — How to run your Python scripts and code
Walks through running python script.py (or py script.py on Windows) and running modules with python -m <module>, with clear examples for each.
DocsPython.org — Command line and environment
The canonical reference for Python command-line options, including -c for inline code and -m for modules.
Step 3 of 7 · AI Coding Mastery
Set up an environment for your project
What's an environment? Think of it like local variables inside a function — they take precedence over globals with the same name, and they're scoped to that function alone. A Python environment is the same idea applied to packages: each project gets its own private set of installed libraries, scoped to that project. This solves a real problem — modules carry their own version-specific dependencies, and without environments, Project A's pandas 1.5 collides with Project B's pandas 2.2 and both break.
The traditional Python approach is a four-command ritual: python -m venv, source .../activate, pip install, then remember to deactivate. The mix of commands (python, source, pip) can get confusing — and if you skip the activate step, half your packages land in the wrong place. In 2026, uv simplifies all of this: one command to set up, one to add a dependency, no activation to remember, and roughly 50× faster than pip.
Goal: project setup in 15 seconds, not 15 minutes.
Four commands, three different tools, in order.
python -m venv venv
source venv/bin/activate
pip install requests
python script.py
Three commands, one tool. No activation.
uv init
uv add requests
uv run script.py
uv finishes in ~2 seconds · pip installs are still running.
Resources
DocsAstral — uv documentation
Official reference for uv init, uv add, uv run, and project / dependency management.
ArticleAstral — Installing uv
Platform-specific install instructions for macOS, Linux, and Windows, plus shell completion setup.
Step 4 of 7 · AI Coding Mastery
Coding IDE — VS Code
Several editors support AI coding. The one most coders reach for is Visual Studio Code — free, cross-platform, and lightweight. It runs on Windows, macOS, and Linux, and starts quickly compared to heavier IDEs.
First move: open the Extensions view and install the Python and Jupyter extensions. That single step unlocks IntelliSense, notebooks, and debugging.
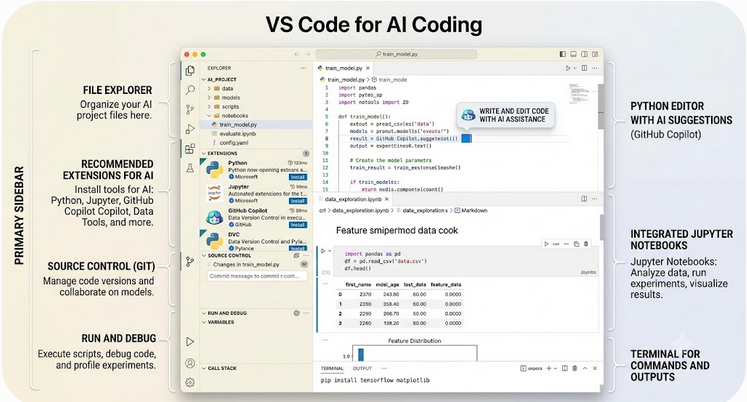
Everything in one window
Built-in Git, a debugger, and an integrated terminal — no tab-switching between separate tools.
Strong AI integration
Inline code suggestions from Copilot and others, right in the editor as you type.
Notebooks done better
Many data scientists prefer VS Code's notebook experience to the browser — better editing, IntelliSense, Git, and debugging in one place.
Lightweight & fast
Launches in seconds, sips memory, and scales from a one-file script to a full multi-folder project.
The Agents window
A companion to the editor you already know — purpose-built for agent-driven development. A dedicated space to explore, iterate on, and review tasks across multiple projects, and switch between them seamlessly.
Resources
DocsVS Code — Getting started with Python
Official walkthrough of installing the Python extension, selecting an interpreter, and running and debugging your first script.
DocsVS Code — Jupyter notebooks
How to create, run, and debug notebooks directly inside the editor, with variable inspection and plot viewing.
Step 5 of 7 · AI Coding Mastery
GitHub & your professional identity
GitHub is a free website where you put your projects so the world can see them. For AI coders it's simply expected — and it doubles as your résumé. Hiring managers and recruiters look at your GitHub profile before they read your CV, because it's where your real work lives, in public, in your name.
So how does your code get there? That's where git comes in — the version-control tool that runs on your own machine. With a few commands, git takes the project and files sitting on your laptop and uploads them to GitHub, keeping a full history of every change along the way. git is the tool; GitHub is the destination.
To use it, you'll learn a small vocabulary — a handful of terms like repo, commit, and push that describe how local work travels up to GitHub. They're below the image.
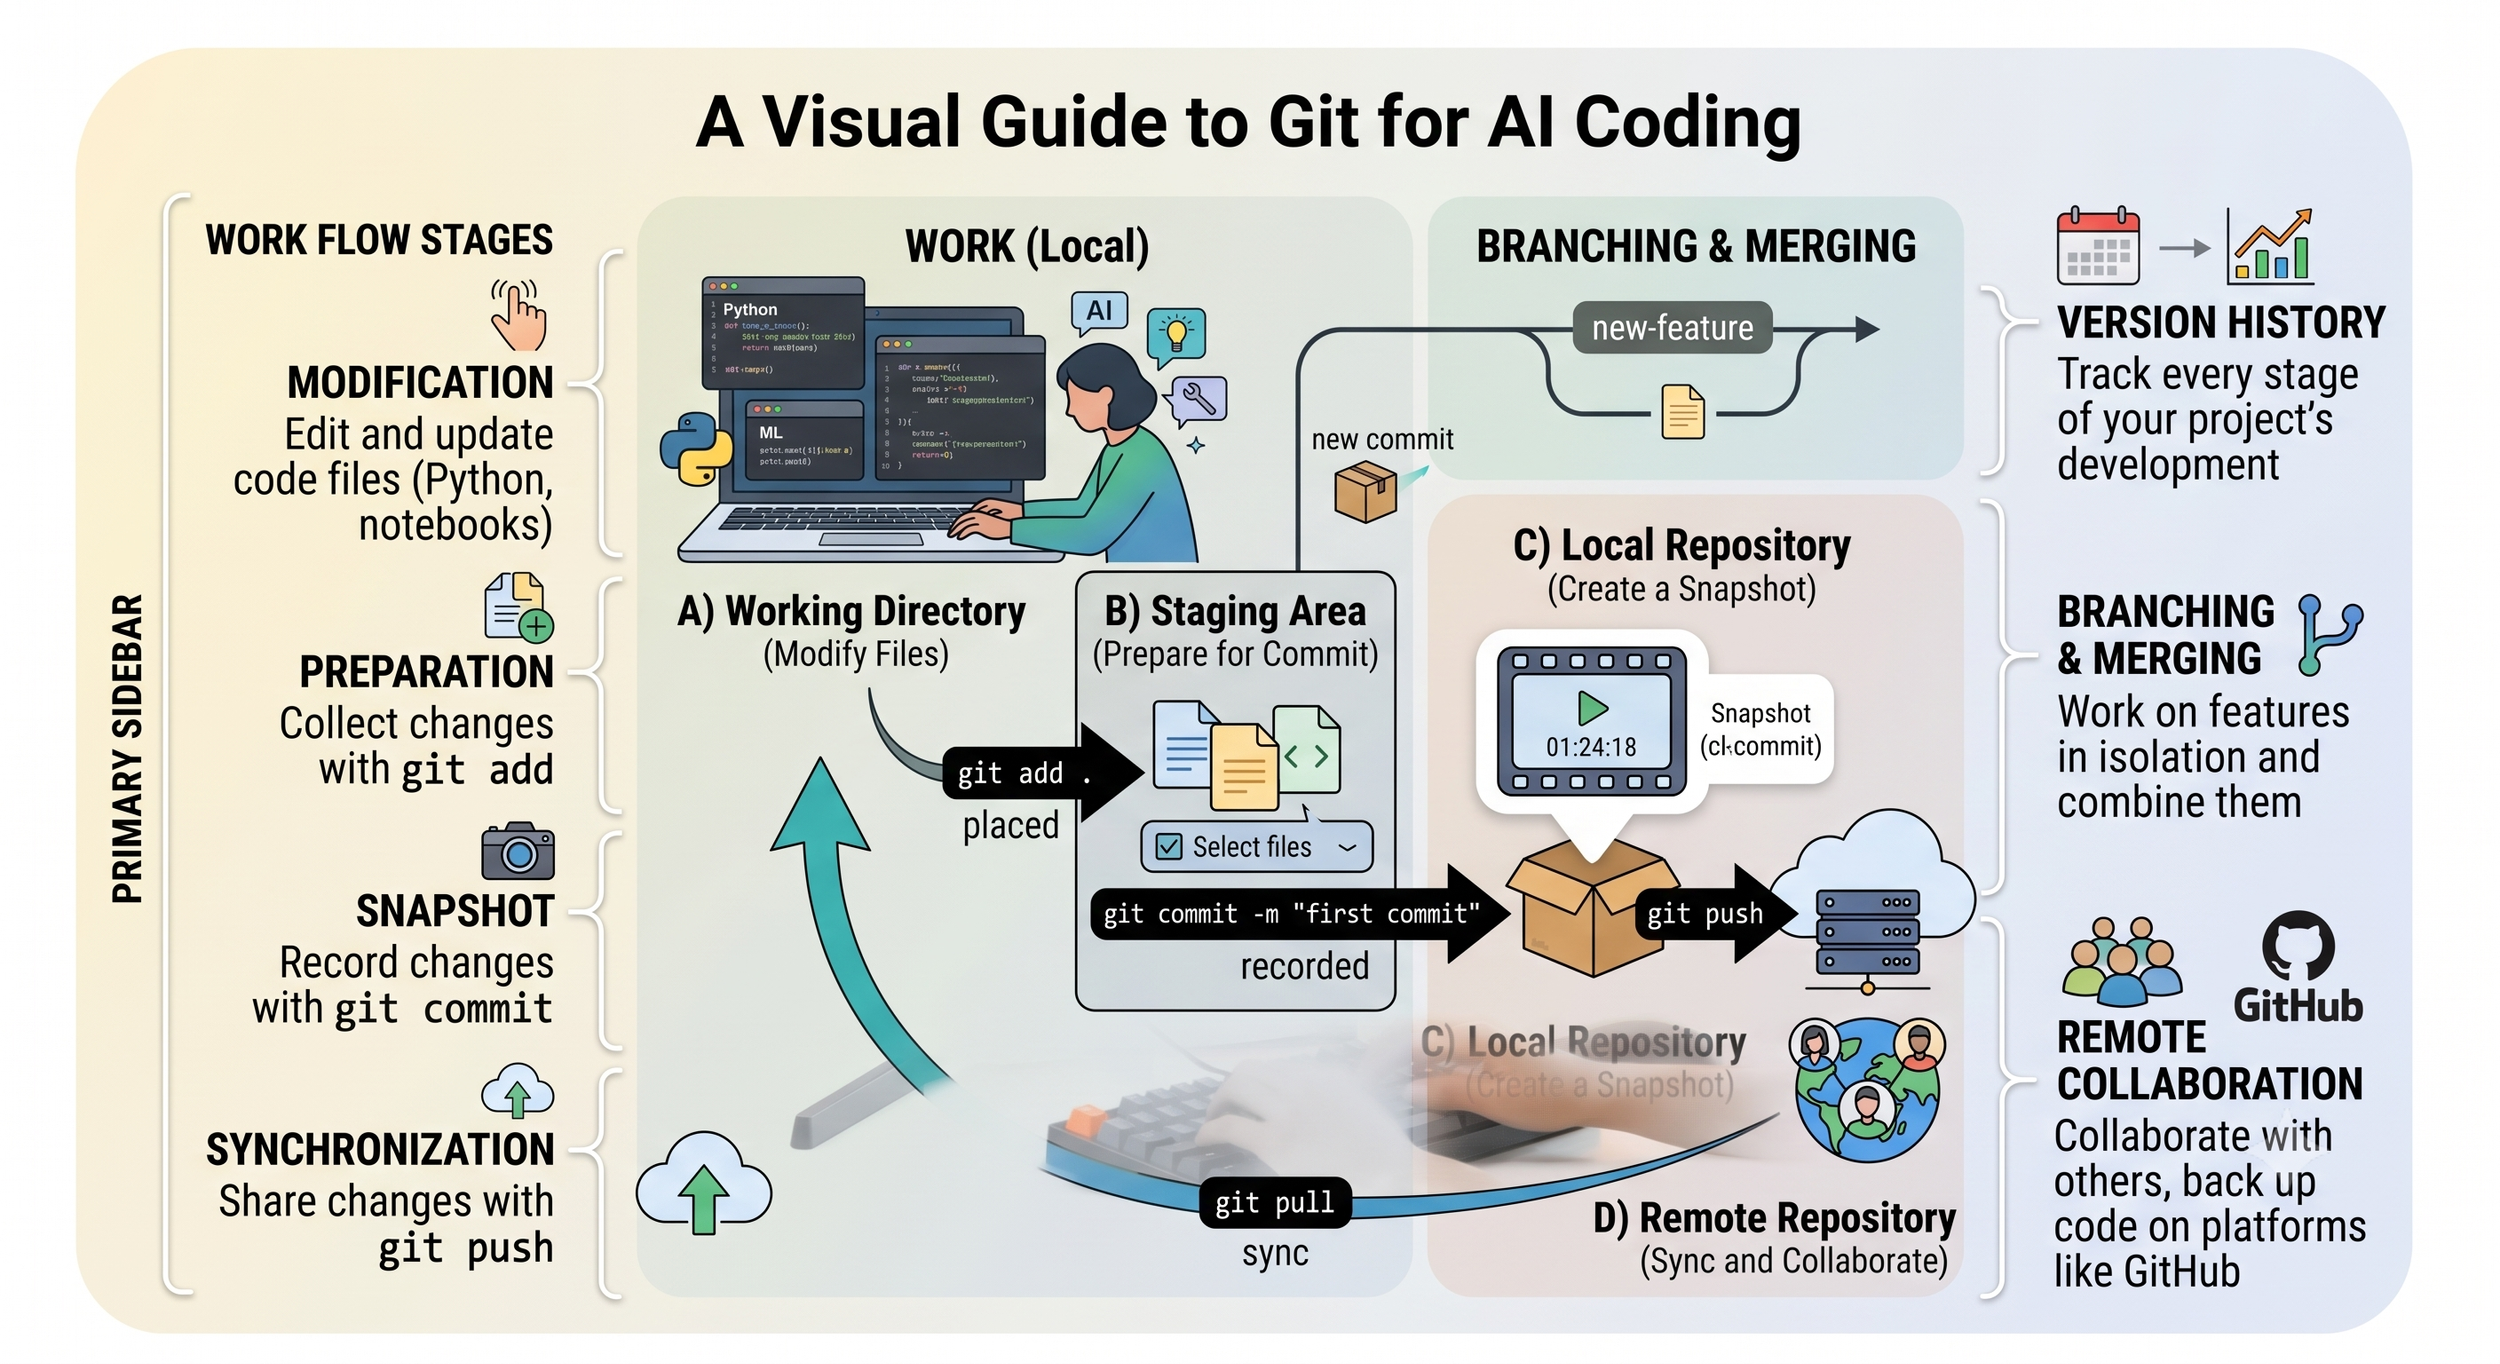
The vocabulary you'll need
Six terms, in the order your code actually travels from your laptop to GitHub.
repo
Short for repository — a project folder that git tracks. Each project gets one, local and mirrored on GitHub.
clone
Copy a GitHub repo down to your machine to work on it — the reverse trip, GitHub to laptop.
add
Stage the files you've changed, marking them ready to be saved into history.
commit
Save a snapshot of those staged changes, with a short message describing what you did.
push
Upload your local commits to GitHub, so your public profile reflects the latest work.
pull
Bring down changes from GitHub to keep your local copy in sync — useful when collaborating.
The everyday loop: edit files → git add → git commit -m "what I changed" → git push. Repeat. That's 90% of git in daily use.
Resources
DocsGitHub — Hello World quickstart
Create your first repository, branch, and commit in about ten minutes — the fastest way to get something on your profile.
ReferenceGitHub — Git cheat sheet
A one-page printable reference for the everyday commands: add, commit, push, pull, clone, and more.
Step 6 of 7 · AI Coding Mastery
API keys & secrets
Every AI tool you'll use — Anthropic's Claude, OpenAI, Google — needs an API key to authenticate your requests. Think of that key as your credit card: it bills to your account, and anyone who has it can spend on your behalf.
Publish a key to GitHub by accident and someone will find it — sometimes within minutes. Bots scan public repos specifically for leaked keys, and a leaked key can run up real charges before you notice.
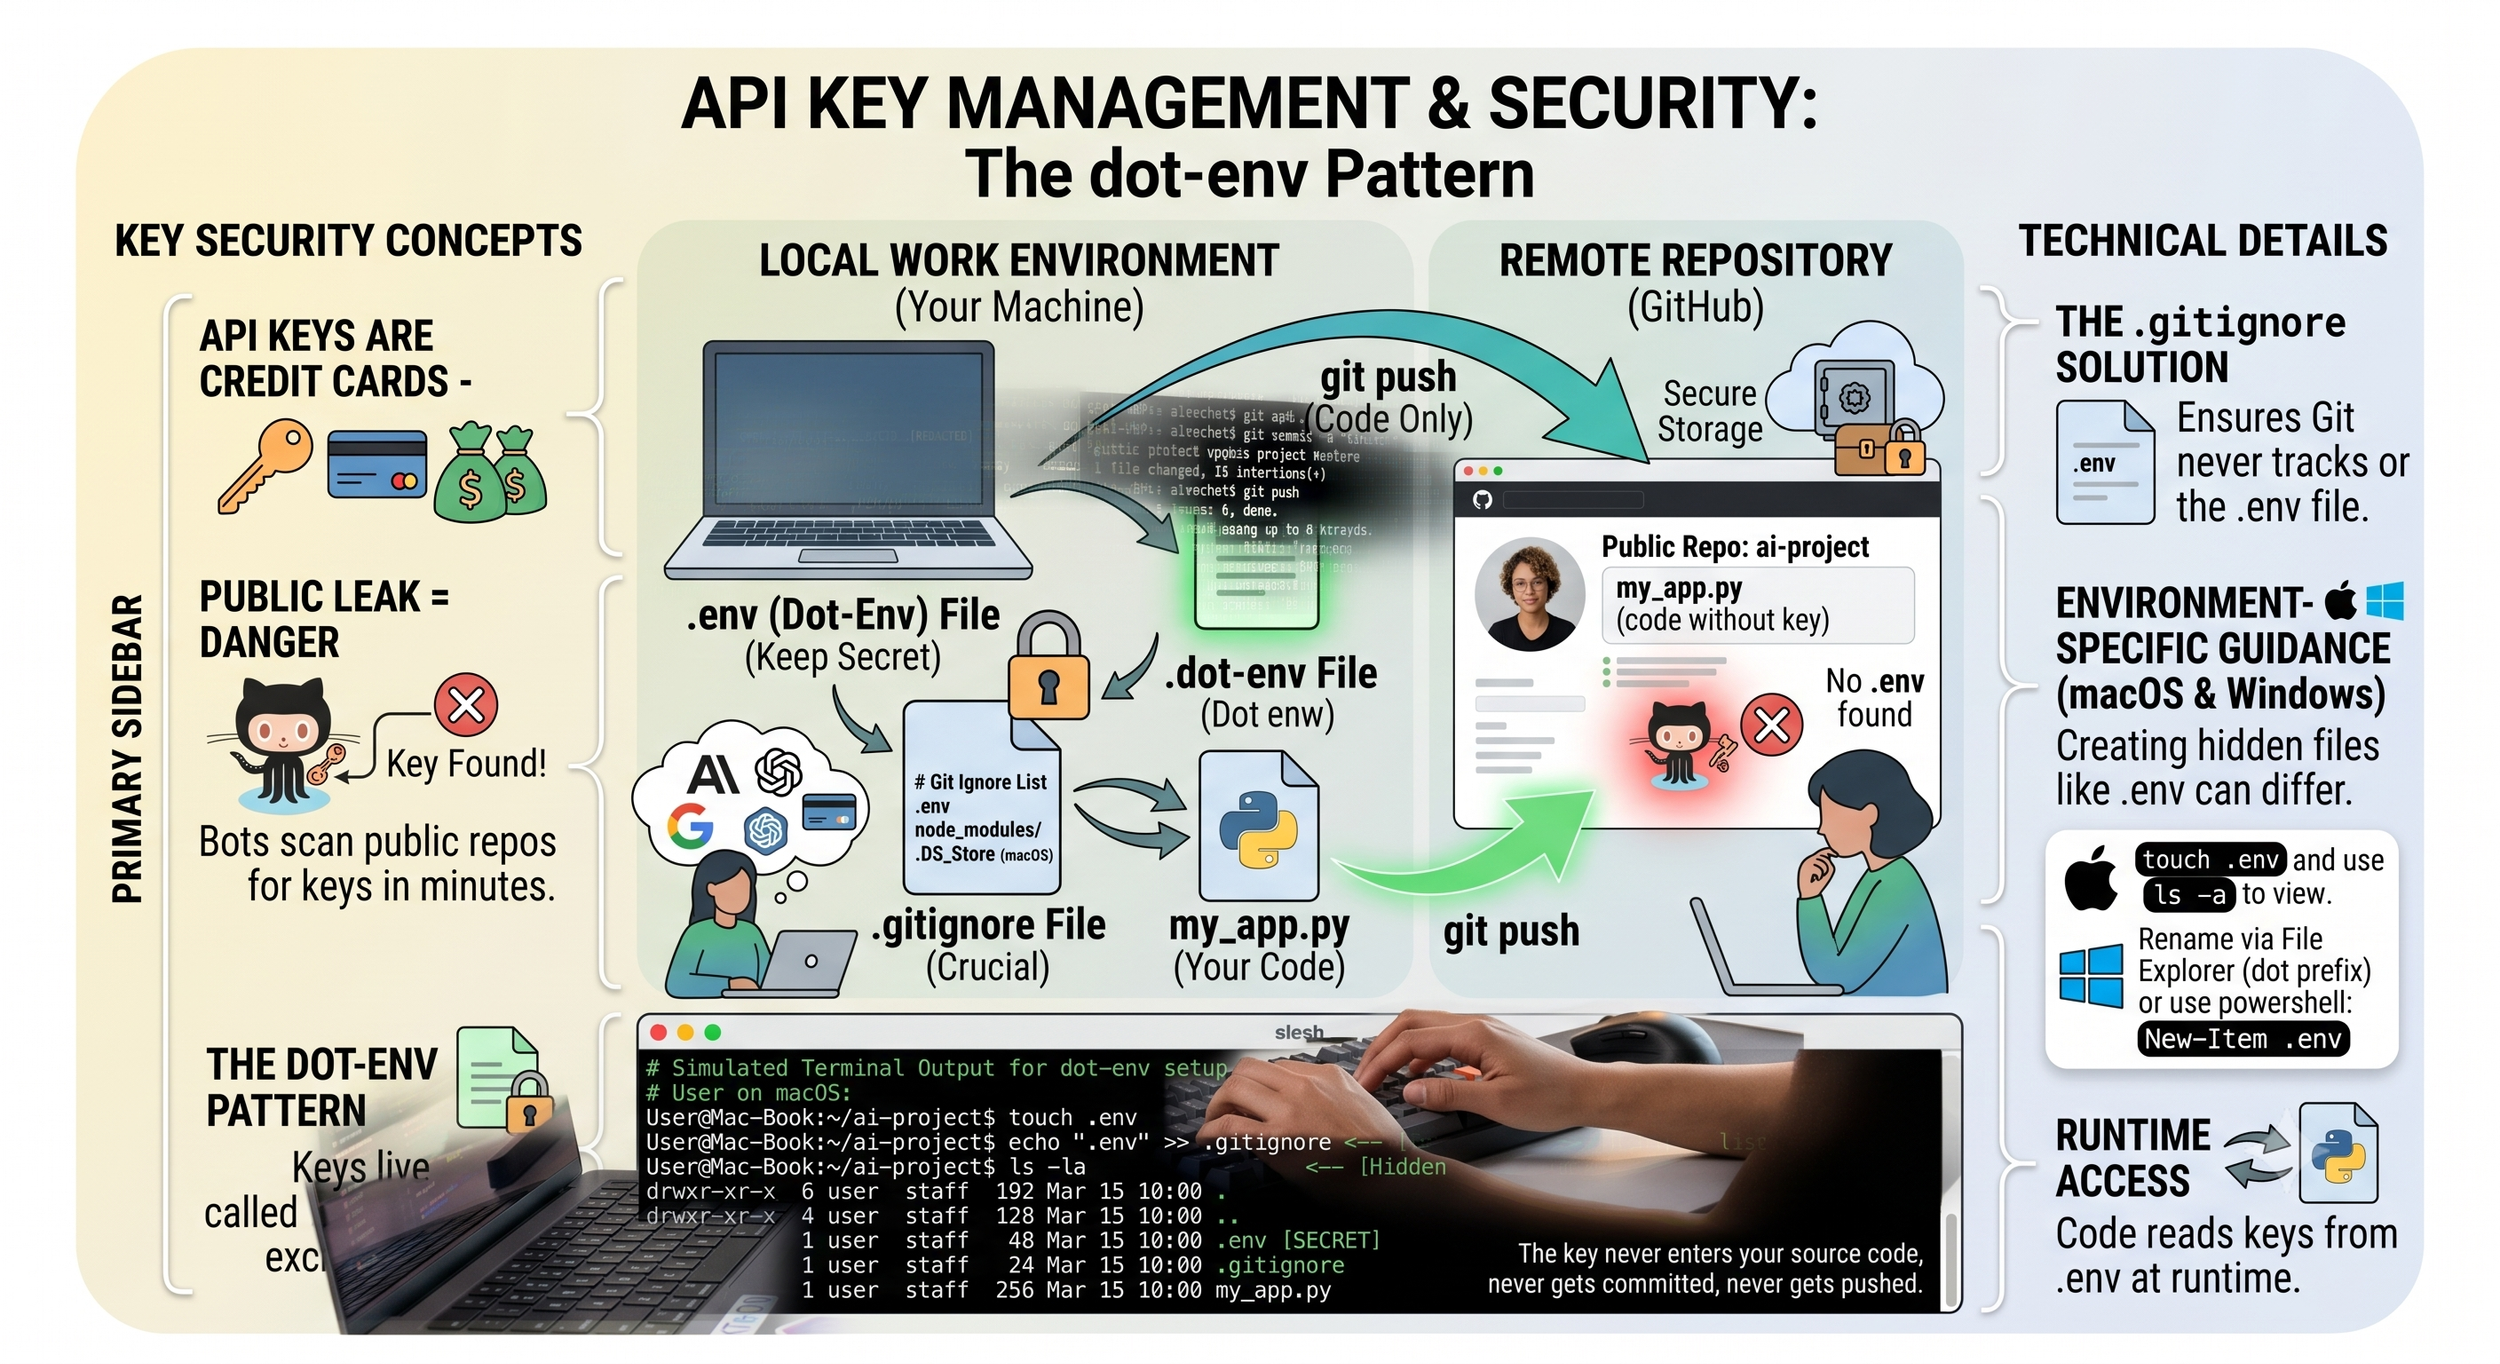
The dot-env pattern
Three pieces that keep your key off GitHub — set them up once per project.
.env
A plain text file holding your secret keys, one per line. It lives on your machine and never leaves it.
.gitignore
List .env here and git will never track, commit, or push it. This is the crucial line of defense.
Read at runtime
Your code loads the key from .env when it runs — so the key is never written into the source itself.
The result: the key never enters your source code, never gets committed, and never gets pushed. Your code goes public; your secret stays private.
Learn this once. It's a skill you set up the same way every time — but get it wrong once and it can cost you real money. This step gets it right the first time, so you never have to think about it again.
Resources
Articledotenv — Official documentation
How the .env convention works and how libraries load it across languages and frameworks.
DocsGitHub — About secret scanning
How GitHub itself detects leaked keys in repos, and what to do the moment a secret is exposed.
Step 7 of 7 · AI Coding Mastery
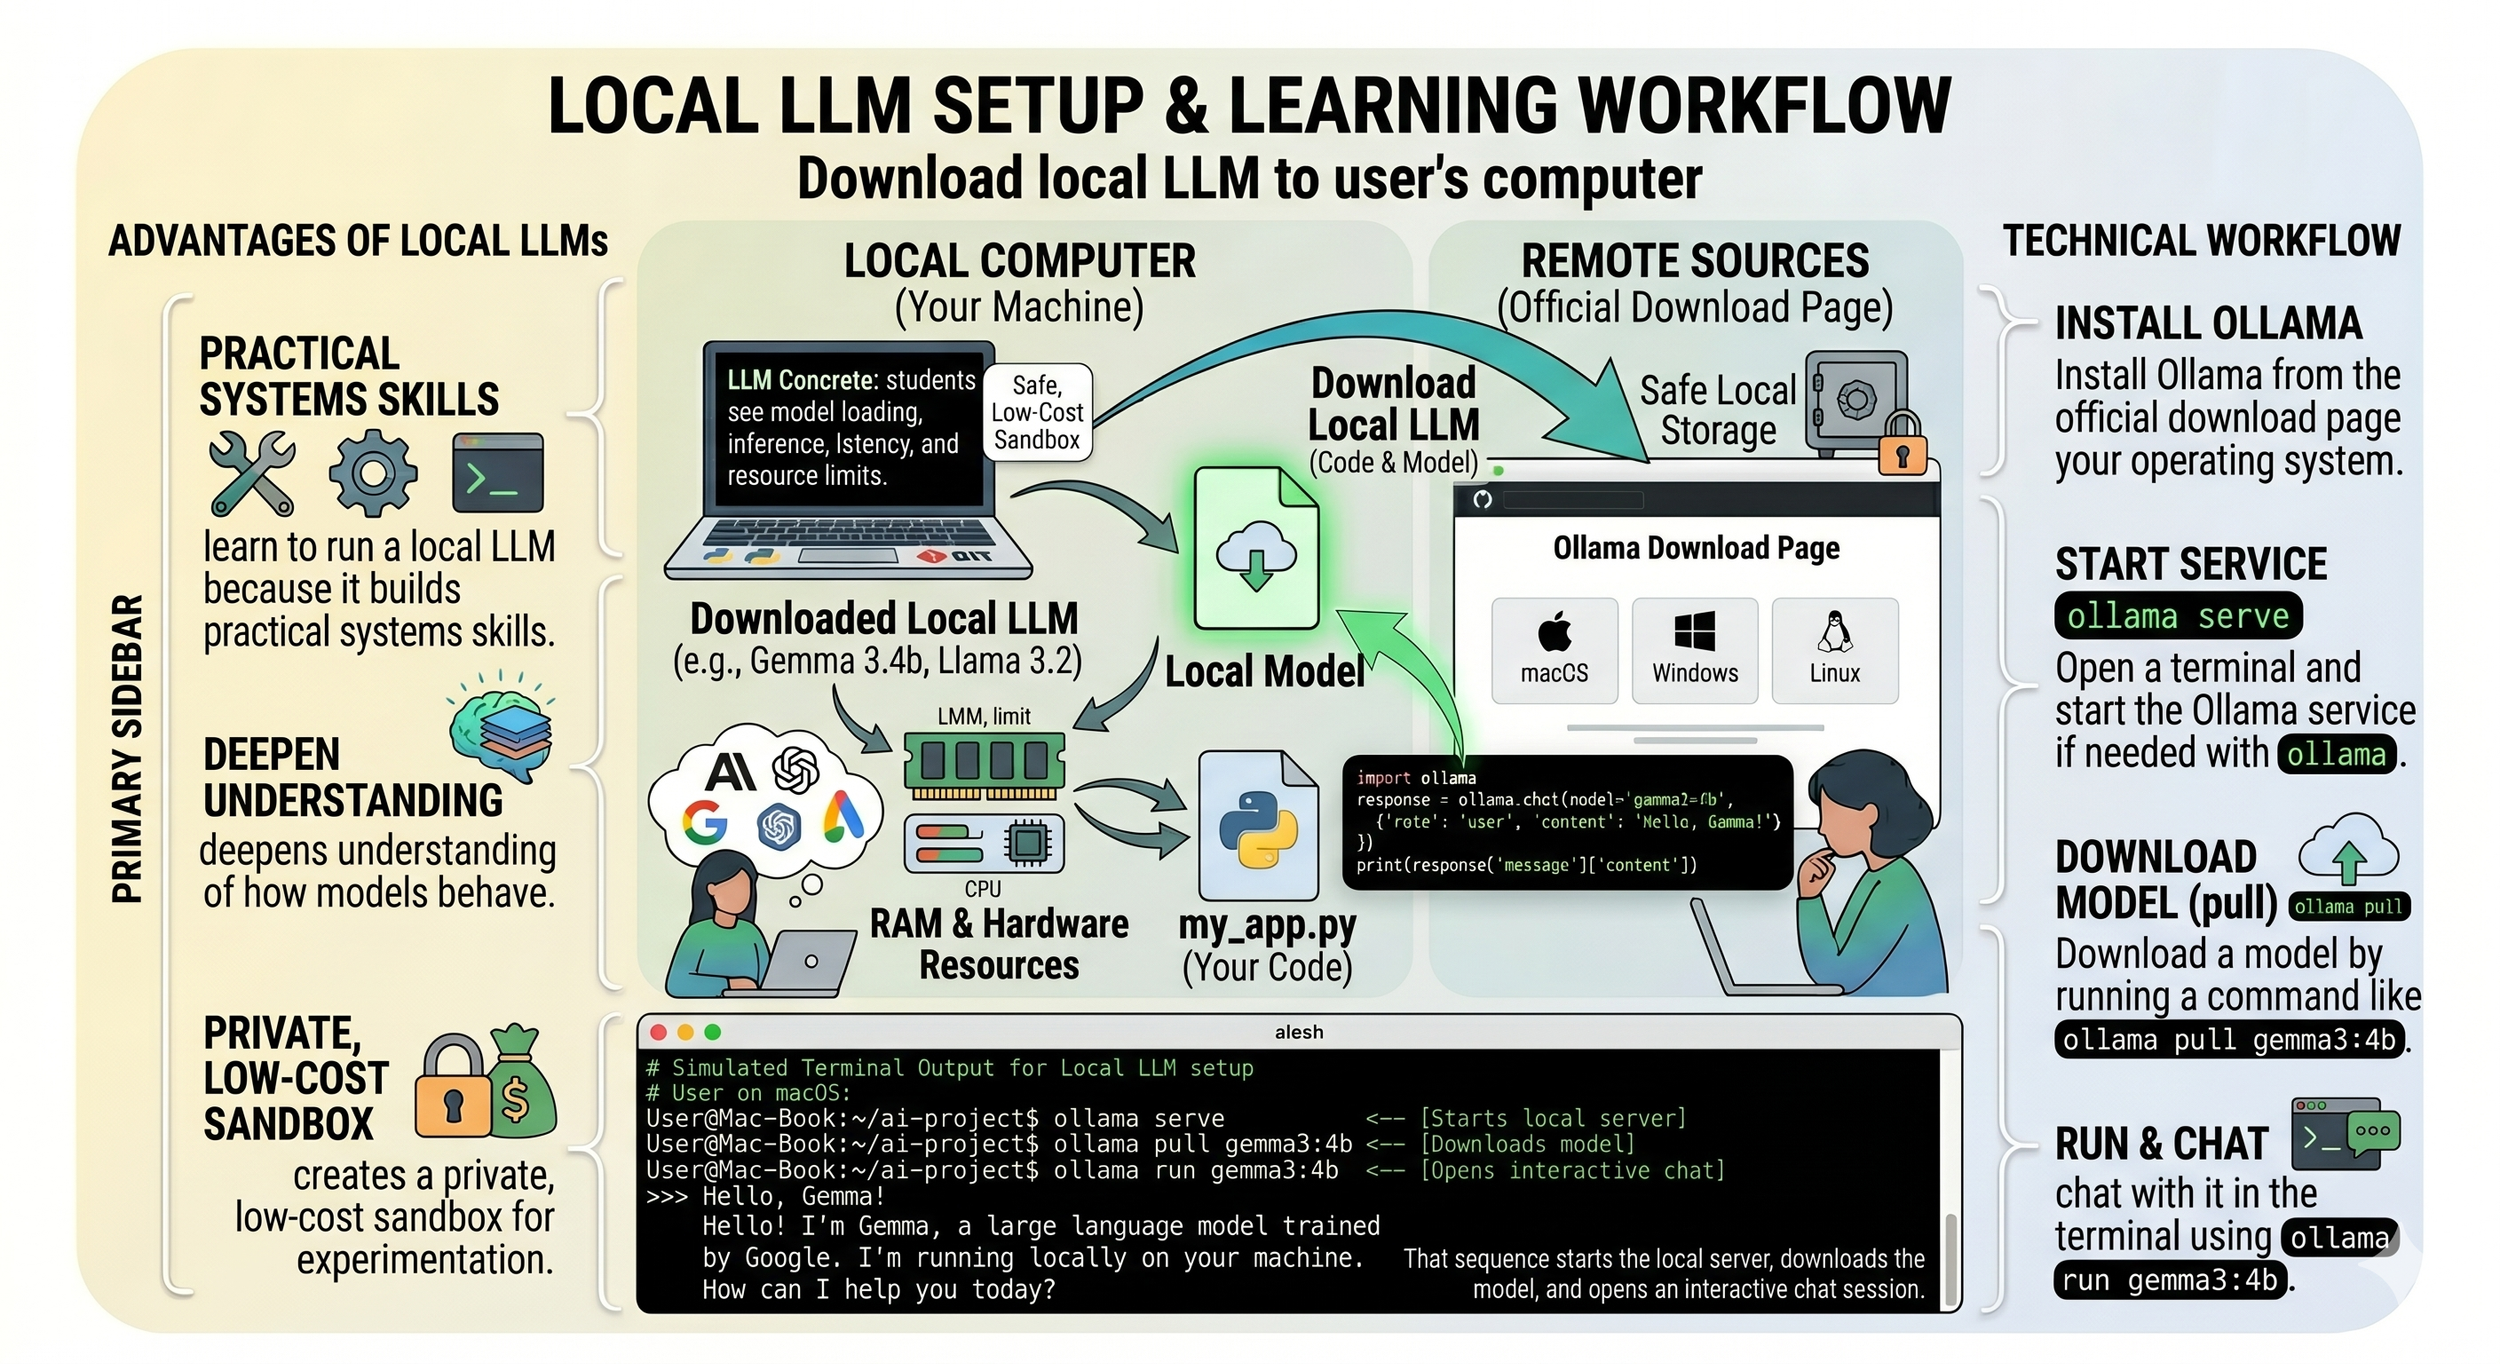
Local LLMs with Ollama
Running a model on your own machine is worth learning — not because it replaces the frontier APIs, but because of what it teaches you. Ollama makes it a few-command setup.
Practical systems skills
You learn how a model is actually served, run, and managed — hands-on infrastructure, not theory.
Deeper understanding
Watching a model behave up close deepens your sense of how these systems actually work.
Private, low-cost sandbox
Experiment freely on your own hardware — no per-token bills, no data leaving your machine.
It makes LLMs concrete. Instead of treating AI as a black box, you see model loading, inference, latency, and resource limits with your own eyes.
Basic Ollama setup
Three steps to a model running locally — shown in the workflow below.
Install Ollama
Download it from the official page for your operating system — macOS, Windows, or Linux.
Start the service
Open a terminal and run ollama serve if it isn't already running in the background.
Get a model
Run ollama run gemma3:4b (or pull) — the first run downloads the model automatically.
Good first models
Start small. You can always reach for a bigger model once you know your hardware can handle it.
gemma3:4b · llama3.2
Smaller models that run comfortably on most laptops. The sensible starting point — fast to download, light on RAM.
Larger models
If your machine has more RAM and stronger hardware, bigger models are worth trying once you're comfortable.
Commands to get started
This sequence starts the local server, downloads the model, and opens an interactive chat session:
$ ollama serve            # start the local server
$ ollama pull gemma3:4b   # download the model
$ ollama run gemma3:4b    # open an interactive chat
Resources
SiteOllama — Download
Official installers for macOS, Windows, and Linux. Start here for step one.
LibraryOllama — Model library
Browse every model you can pull, with sizes and hardware notes to help you pick.